
Glue the rosette design onto your inlay material and cut it out with a jeweler’s saw. Use the same process to cut out the pickguard. Using a small jeweler’s router with a base, route out the cavities for the rosette and pickguard, after tracing the outline of the inlay onto the soundboard. Glue the rosette and […]
Adding the braces to the top
The braces are glued to the underside of the top. Glue in the top seam reinforcement (a thin strip of bracing wood with grain running perpendicular to the grain of the top). Glue in the soundhole reinforcement plate. Some makers install the plate so that the grain runs parallel to the grain of the top, however, I […]
Making the neck blank

The neck blank is made of curly maple (although normally, Basswood is used). The board is cut into three pieces so that the middle piece is 1/8 inch thick. Two contrasting pieces of hardwood are inserted to add stiffness to the neck. Usually, woods such as ebony, rosewood or wenge are used. Titebond or epoxy can […]
Cutting the headstock angle

Glue the headstock blank to the front of the neck blank with Titebond glue and a piece of newspaper between the two pieces (this makes it easier to separate after cutting). When the glue has dried, cut the headstock angle on a table saw with an angle guide, or with a handsaw. Once the cut is made the excess […]
Making the stripes

The stripes are thin pieces of contrasting wood glued between the staves. Their only purpose is decorative. Cut the stripe to length and bend it to shape on the hot bending iron. Because the stripes are so thin and delicate, a great deal of care must be taken to avoid breaking them. However, they don’t […]
Adding staves and stripes to the body
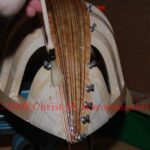
Make another stave in the exact same manner as the center stave. After the edge has been flattened on the planing table, hold it on the form next to the center stave. Check the fit and mark any gaps between the edges with a pencil. Return the stave to the planing table and plane the […]
Making the sides of the body

Making the sides is very similar to making the staves. Measure and cut to length a piece of Maple wide enough to reach the top edge of the body, and bend it to shape. Check the fit of the edge, just as on the staves. A more elaborate stripe sandwhich can be made of two contrasting stripes […]
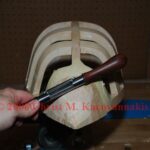
Adding the capping strip

Once the side pieces are dry, scrape the entire body with a cabinet scraper and sand down to medium grit (150) sandpaper. The scraping and sanding should produce a nice smooth curve to the back. Unlike a lute, which maintains the flat surfaces of the individual staves, with a nice sharp angle between the staves, […]
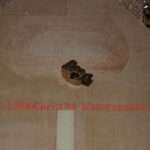
Making the form for the body

This form is designed around what I consider the “standard” four-course bouzouki (tetrahordo) size and shape. You can make a closed (solid) form or an open form. Each has its advantages and disadvantages. An open form is a little easier to make, takes less wood, it allows you to see and feel under the staves while […]
Carving the headblock
Attached the Basswood headblock to the form with two wood screws. Carving is done with a drawknife and spokeshave, and the headblock is finished with files and sandpaper. I also install a tailblock into the form, also made of Basswood. Many makers make the body first, and then install the tailblock after the body is […]