Greek Bouzouki Construction Blog
This is my Greek Bouzouki Construction Blog. I will be posting pictures and an explanation of how I design and make my instruments. I will also be covering other Greek bouzouki topics related to purchase, proper set up, and playing accessories. Please stop by often, and feel free to ask me any questions you may have.

Archive for February, 2008

Adding the capping strip

Saturday, February 23rd, 2008

Back of body 

Once the side pieces are dry, scrape the entire body with a cabinet scraper and sand down to medium grit (150) sandpaper.  The scraping and sanding should produce a nice smooth curve to the back.  Unlike a lute, which maintains the flat surfaces of the individual staves, with a nice sharp angle between the staves, a bouzouki should be rounded and smooth.

Back capping strip beingt glued 

The capping strip (kolantza in Greek) is made up of three pieces; the back and two side pieces.  The back is cut to shape, bent on the hot bending iron and then glued in place. 

Side capping strip being glued 

Then the sides are cut to shape, bent on the hot bending iron and glued into place. 

Decorative seam treatment

The seam where the back and each side piece meets is usually left wide, and a decorative piece of shell or wood is glued in place.


Making the sides of the body

Friday, February 22nd, 2008

Glueing the side 

Making the sides is very similar to making the staves.  Measure and cut to length a piece of Maple wide enough to reach the top edge of the body, and bend it to shape.  Check the fit of the edge, just as on the staves.  A more elaborate stripe sandwhich can be made of two contrasting stripes and one piece of the main body wood, or a single stripe can be used.  At the back, mark the center line of the body onto the back edge of the side piece and cut it.  When you make the second side piece, this back edge must be fit, along with the side edge.  Apply hot hide glue and hold the side pieces in place with hand clamps.

Adding staves and stripes to the body

Sunday, February 3rd, 2008

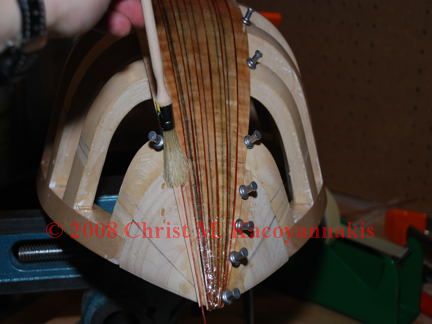
Adding staves and stripes 

Make another stave in the exact same manner as the center stave.  After the edge has been flattened on the planing table, hold it on the form next to the center stave.  Check the fit and mark any gaps between the edges with a pencil.  Return the stave to the planing table and plane the edge everywhere except the spots where there were gaps.  Continue fitting and planing until the edge of the second stave meets perfectly with the center stave.  Apply hot hide glue to the headblock, tailblock, underside of the tips of the stave, adjoining edge of the stave, and both sides of the stripe.  Lay the stripe between the two staves and hold them together with tape or push pins.  Let them dry.  Continue adding staves and stripes, alternating from side to side until you get to the sides of the body.  Make sure that all the staves are of equal width.

Making the stripes

Saturday, February 2nd, 2008

Bending stripe

The stripes are thin pieces of contrasting wood glued between the staves.  Their only purpose is decorative.  Cut the stripe to length and bend it to shape on the hot bending iron.  Because the stripes are so thin and delicate, a great deal of care must be taken to avoid breaking them.  However, they don’t have to be bent to the exact shape of the form, because they can be flexed a bit while glueing to match the curve of the adjoining stave.  Don’t glue the stripe in yet. 

Visual Design by Logo design by The Logo Loft The Logo Loft